Showing posts with label recipes. Show all posts

Wednesday, August 5, 2015

Zucchini Bake

We've been so blessed this summer with garden goodies.  The best part?  Someone else did all the work!  Our friends have supplied us with deliciousness from their gardens and we have enjoyed every single bite of their generosity.

Most recently a neighbor gave us some zucchini.  I usually make zucchini bread but I was kind of in the mood to do something else.  I googled some zucchini casserole recipes and ended up making a variation of my own by combining several of the things from the different recipes.  I'm calling it Zucchini Bake.  I made it for dinner Monday night and it was really, really good.  The whole family liked it - everyone asked for seconds.  You must give this a try!

Ingredients:

2 large zucchini or maybe 4 small/med ones.

I used these.


2 (or more) tablespoons chopped fresh basil
2 (or more) tablespoons sliced green onion
1 tsp garlic powder
1 1/2 cup bread crumbs
1/2 cup Parmesan cheese 
2 (or more) cups Mozzarella cheese + 1/2 cup
salt and pepper to taste


Directions:

Preheat oven to 350 degrees.  Spray 9 x 13 with non-stick spray.  Wash and cut up zucchini.  


Chop up basil and slice onions.


Combine the zucchini, basil, green onions, bread crumbs, and both kinds of cheese.  Stir together until zucchini is well coated.  Season with salt and pepper.
Put in baking dish and bake uncovered for 30 minutes.  Take the casserole dish out of oven and sprinkle with remaining 1/2 cup mozzarella cheese.  Put dish back into oven and bake for additional 10 - 15 minutes until hot and bubbly.


This could certainly be a main dish but I served it as a side dish with fried chicken, okra, and biscuits.  I also went a little overboard with cheese.  My family loves cheese.  :)

Saturday, February 21, 2015

A Smooth Weekend

I'm stepping away from the Saving Series for just a minute to share with you a blog I'm beginning to love.  

A friend served me a most delicious smoothie while I was at her house recently and it sparked a discussion, a discussion which led right to http://www.greenplaterule.com/    

Since finding this great place I've been enjoying looking and learning.  I thought some of my readers just might want to know about it too. 

For the past several days I've been making the same smoothie my friend served me for my honey and kids (and myself, of course).  We are loving it!  It's a perfect little treat that packs a healthy punch.  


Here's the recipe if you should want to whip one up for yourself.  

Strawberry Banana Smoothie

  • 3/4 cup unsweetened non dairy milk (I've been using coconut milk.)
  • 1 frozen banana
  • 5 large strawberries
  • 2 tsp honey
  • 1/2 tsp vanilla extract
Add all the ingredients to a blender.  Start on low speed and slowly increase to high.  Blend until smooth, about 1 minute.  

The smoothie you see pictured is a little more purple because I added blueberries and raspberries.  I found organic berries at Costco for a great price, as well as organic honey.  My husband has been asking me to make him one each day to drink on his drive to work.  I'm more than happy to do it.  

My smoothie serving friend had a lot of good things to say about Green Plate Rule and especially the Ginger Butternut Squash Soup.  Her 13 year daughter was also part of our conversation and she was nodding her head in hearty agreement when her mom said this soup is delicious.  I'm going to be trying it next.

If you head over to Green Plate Rule and you're looking for a place to start, I would say, HERE.  I've been thinking a lot about bread lately and this post is most helpful. 

I hope you are having a cozy weekend.  Ours is pretty smooth.  

Thursday, February 5, 2015

Scottish Shepherd's Pie from Weeknight Dinners

Hi, friends!

Just a reminder...

Today is the last day to enter the drawing to win Weeknight Dinners.  If you haven't entered yet make sure you do so today!


This is also the last day I will be posting a recipe from Weeknight Dinners.  I've chosen one from the Comfort Food Thursday section of the book.  
{Have I mentioned I love this cookbook??}

Scottish Shepherd's Pie

1 lb lean ground beef
1/2 c. yellow onion, diced
1 c. carrot, peeled and diced
1 oz pkg. brown gravy mix
1 to 3 t. curry powder, to taste
4 c. mashed potatoes, warmed

Brown beef, onion and carrot in a skillet over medium heat; drain.  Meanwhile, prepare gravy mix according to package directions; stir desired amount of curry powder into gravy.  Add gravy to beef mixture.  Spoon into an ungreased 2 quart casserole dish.  Top with warm mashed potatoes.  Bake, uncovered, at 350 degrees for 30 to 35 minutes.  Makes 4 to 6 servings.  

My honey and kiddos love Shepherd's Pie...it smells so delicious baking and it is perfect on a cold night.  (And just so you know, instant potatoes work just fine!) 

We've been talking a lot about food lately.  I could talk about it all the time.  I love to cook and bake and my family loves to eat.  I do, however, have some other things for us to talk about.  Next week I'm going to start a series of posts on SAVING - saving money, saving space, and saving time.  I hope you'll meet me back here for that because I will want to hear your thoughts.   

Have a cozy day!

Wednesday, February 4, 2015

Creamy Marinara Linguine and Chicken Pockets

Hello!

Hope your Wednesday is off to a great start. 

I brought you another recipe from Weeknight Dinners.  Have you entered to win this fantastic cookbook yet?  If you don't know how, ask me now!

Here's one from the Wednesday is Italian Night section of Weeknight Dinners.  

Creamy Marinara Linguine

16 oz pkg. linguine pasta, uncooked
2 cloves garlic, minced
1/4 c. olive oil
14 1/2 oz. can petite diced tomatoes
15 oz. jar Alfredo sauce
1/2 c. chicken broth or milk
1 t. dried Italian seasoning
1 t. dried parsley
salt and pepper to taste

Cook pasta according to package directions; drain.  Meanwhile, in a skillet over medium heat, saute garlic in olive oil for 30 seconds.  Add undrained tomatoes; heat through.  Add Alfredo sauce and chicken broth or milk.  Stir until heated through; add seasonings.  Serve over cooked pasta.  Makes 4 servings.

I also brought you my recipe for Chicken Pockets.  I made these for dinner last night and they are oh.so.good.  Hopefully all of these recipes I've been giving you lately have helped to make answering the what's for dinner question easier.  These pockets are so delicious and filling.  My family loves them and yours will too.  

Chicken Pockets

Chicken ( I cooked three pounds in the crock-pot with chicken broth and then shredded when I was ready to make my pockets.)

Crescent rolls ( I used 2 cans for a total of 8 Chicken Pockets.)

6 oz. cream cheese

1 stick of butter

salt

chives

1/2 stick melted butter

crushed croutons

Mix cream cheese, butter, chopped chicken, salt, chives together in large bowl.  Press 2 crescent rolls together to form a square.  Put about 1/2 cup chicken mixture (or more) in middle.  Fold corners over to make a bundle.  Dip in melted butter.  Top with crushed croutons.  Bake at 350 degrees for 20 minutes.  YUM!


If you're considering trying one of these recipes please let me know.  I'd love to hear what you think.  

Have a cozy day!!!


Tuesday, February 3, 2015

SUPER (batter) BOWL Football Cake and a recipe from Weeknight Dinners


I think I mentioned the other day that my girls were planning to make some football cupcakes for the Super Bowl.  Well, we changed that and decided to make a football cake instead.  I realize the Super Bowl is over, for this year anyway, but I thought I would share this simple little cake we did for those of you who might want to make one for a birthday party or team party or some other football event. 

I've mentioned before, I am not a professional cake maker.  I'm not even very good at it.  I just enjoy trying fun little cake ideas and since my kids are easily impressed there's no pressure for anything elaborate or fancy.  You can make this cake easily with basic ingredients and little time.  I baked the cake before we left for church Sunday morning and put it together in just a few minutes Sunday afternoon.  


If you decide to bake your own football here's what you'll need:

1 box (18 to 19 ounces) cake mix, any flavor
2 cups chocolate icing
small amount vanilla icing

Preheat oven to 350 degrees.  Grease and flour batter bowl, or spray with non-stick vegetable spray.  Prepare cake mix according to package directions, pour batter into prepared batter bowl and bake 50 to 60 minutes, or until cake tester inserted in center of cake comes out clean.  


Cool cake in bowl on cooling rack 15 minutes, then invert bowl on rack and leave in place 3 to 4 hours for cake to release from bowl.  Cool thoroughly before decorating.  


With serrated bread knife, trim wide end of cake to make a flat surface for cake to rest on.  Turn cake over to rest on flat bottom and slice in half vertically from narrow end at top to wide end at bottom.  Arrange halves on cake board with the two bottom surfaces pressed together.  Spread with chocolate icing.


I used a lot of extra icing in the middle where the two sides are matched up and put a rough coat of icing all over.  One thing I like to do before I start is put wax paper under the edges of the cake.  When I am finished with the icing I can slide the wax paper out from under the cake and my cake board is mess free.  


A little trick I've learned for making a smooth finish is to use the edges of a sheet of paper.  Just drag it along the cake and your icing will smooth right out.


I used green icing to make "grass" around the football.  You could also tint some coconut green and use that for your grass.  The last thing you'll need is a tiny bit of white icing to make the laces.  


This little cake is simple and fun!

Since today is Tuesday I chose a recipe from the Tuesday is Tex-Mex Night section of Weeknight Dinners for today's recipe.  If you haven't entered to win the drawing for this fabulous cookbook make sure you do that today!  You can enter to win by "liking" Homegrown Cozy on facebook, or by becoming a member of this blog.  Just leave a comment letting me know which one you did.  (Even if you are already a follower just leave a comment letting me know you would like to be entered in the drawing.)  For an additional entry in the drawing share any post from the blog on facebook, pinterest, or your own blog/website.  Each time you share that is an additional entry in the drawing.  Just don't forget to let me know what you did so I can put another entry in for you.  Thanks so much!!

Now, for today's recipe...

Fiesta Chicken Soft Tacos

2 T. oil
1/2 yellow onion, diced
1/2 green pepper, diced
2 to 3 cloves garlic, minced
1 lb boneless, skinless chicken breasts, cubed
1 to 2 T. taco seasoning mix
1 1/2 c. chunky salsa
4 6 inch flour tortillas
Garnish:  shredded Cheddar cheese or other favorite toppings

Heat oil in a skillet over medium heat.  Add onion, green pepper and garlic; saute until tender.  Add chicken; cook until no longer pink, about 5 to 8 minutes.  Stir in taco seasoning and salsa; simmer for 3 minutes.  To serve, spoon mixture onto tortillas.  Fold over once; garnish as desired.  Makes 4 servings.  


Saturday, January 31, 2015

Happy Saturday!

Do you have any projects planned for the weekend??

We are getting Super Bowl ready...I'm making Nacho Dip and my girls are going to make football cupcakes.

We are also going to finish up some Valentine's Day decorating.  I don't do a whole lot but there are a few hearts and such to scatter around.  One of my boys bought a really cute banner to put on the mantle.  I will show you in a bit.  I think my oldest gal is going to make a Valentine pillow for the rocking chair.

We've also got to get some things ready for school next week.  

As much as I just want to stay home today I will have to head out.  A trip to the grocery store is a must, and it's looking like I may be making a trip to Hobby Lobby as well.  (But, I don't ever mind that.)  If you are shopping there too, make sure you go HERE and pick up a coupon.  

Before I leave the house I want to have a plan for dinner because I know how a couple of hours of errands can turn into more and then we get home right at dinner time and everyone is hungry and looking at me wondering what's to eat.  

Do you have a dinner plan for tonight?  

I'm currently doing a giveaway for a fabulous cookbook- Weeknight Dinners.  If you haven't done so already you can register for the drawing today! 

Here's a recipe straight out of Weeknight Dinners that just might strike your fancy.  

Jan's Pork Chops & Pierogies

10 3/4 oz. can cream of onion soup
1/4 c. water
10 oz. pkg. frozen chopped spinach, thawed and drained
1 onion, chopped
Optional:  1/4 c. hot peppers, chopped
6 boneless center-cut pork chops
salt and pepper to taste
12 oz. pkg. frozen mini potato pierogies
Optional:  sour cream

In a bowl, mix together soup, water, spinach, onion and peppers, if using.  Spread some of the soup mixture in the bottom of a large slow cooker.  Season pork chops with salt and pepper; arrange over soup mixture.  Top with remaining soup mixture.  Cover and cook on low setting for 4 hours.  Shortly before serving, turn slow cooker to high setting.  Add frozen peirogies to slow cooker, pushing them down into sauce.  Cover and cook on high setting for about 20 minutes, until pierogies are cooked through.  Top peirogies with a little sour cream if desired.  Makes 6 servings.  

I hope your weekend is extra cozy.  Make time to love the ones you love!

Friday, January 30, 2015

Yumminess for Your Weekend

What could be better on a Friday than a couple of yummy {and simple} recipes to get your weekend started on the right note??

Here's one of my favorites that's quick to make and uses ingredients right out of your pantry and, as promised, a recipe from Weeknight Dinners.  (Have you entered to win yet??)

EASY Taco Casserole

1 lb ground beef
1 cup salsa
1/2 cup sour cream
2 T. chili powder
2 c. crushed tortilla chips
2 c. shredded Colby Jack cheese
Chopped tomato and shredded lettuce

Brown and drain beef; add salsa, sour cream and chili powder.


(Don't let these pictures scare you.  I double or triple every recipe.)

Mix well, then layer 1/2 meat mixture in un-greased 2 quart baking dish; also 1/2 chips and cheese.  


Repeat layers.  


Bake at 350 degrees for 20 to 25 minutes.  


Top with tomato and lettuce just before serving.  


The thing I love about Weeknight Dinners is the way the cookbook is divided into a different theme for each night of the week...

Meatless Monday
Tuesday is Tex-Mex Night
Wednesday is Italian Night
Comfort Food Thursday
Just for Fun Friday

Since today is Friday I thought we should start there.

Applesauce Pulled Pork

3 to 4 lbs country style pork ribs, cut into 6 pieces
salt and pepper to taste
1 c. cinnamon applesauce
18 oz. bottle barbecue sauce
Optional:  6 sandwiches buns, split

Season pork with salt and pepper; arrange in a large slow cooker.  Spoon applesauce and barbecue sauce over pork.  Cover and cook on low setting for 8 hours, or until very tender.  Pull pork apart with 2 forks.  Serve on sandwich buns, if desired.  Makes 6 servings.  

I'm going to try this over the weekend!  YUM!!

Hope your weekend is super cozy!

Friday, January 16, 2015

A Suppertime Favorite

Tonight for dinner we're having Spaghetti Casserole!  I'm making two and taking one to a friend.  We love Spaghetti Casserole around here, and since we do I thought you might too, so here's the recipe.  It's yummy!!


1 pkg (16 oz) Angel Hair Pasta

1 1/2 lbs ground beef

1 jar (26 oz) Spaghetti Sauce

1 can cream of mushroom soup

8 oz sour cream

8 oz Colby Jack cheese (shredded)

Cook pasta according to package directions.  Cook beef over medium heat.  Drain.  Return beef to skillet and stir in the sauces.  Remove from heat.  Drain the pasta.  Combine the soup and sour cream.


In a 9x13 baking dish layer meat sauce, pasta, soup mixture and cheese.  Repeat the layers.  (I did this one in a disposable aluminum pan to make clean-up easy for my friend.)


Cover and bake casserole at 350 degrees for 55-60 minutes.  


Serves 6-8.


It's sooo good!


I snapped this picture of our 3 year old but I should have gotten the teenagers.  They devour this meal and claim it to be one of their most favorites.  

Monday, December 22, 2014

Monkey Munch


We started making some of our favorite Christmas goodies today.  The holidays sure sneak up quickly, don't they?

We've been making this for close to 20 years and it is one of the things the kids look forward to most.  We only make it at Christmas time so that makes it extra special.  I was reminiscing today as I looked at my little tattered recipe.  I can remember, when our boys were just babes, cutting this recipe out of a magazine.  Remember when you did that - before Pinterest?  I still have that little magazine clipping and for some reason it warms my heart when I pull it out each year.  

The kids have almost always helped me mix this up but today one sweet boy asked to do it all by himself.  I was happy for him to do it.  I have more than enough to-dos on my list and I'm happy when someone wants to take something off my hands.  

Oh, and I should tell you, the official name for this is Chex Muddy Buddies.  I named it Monkey Munch the first Christmas I made it because at that time I always referred to our children as my little monkeys.  They gobbled this stuff up so quickly it would just disappear.  The name stuck, and all these years later they are still devouring it. 

Monkey Munch


9 cups Corn, Rice, or Wheat Chex cereal
1 cup semisweet chocolate chips
1/2 cup peanut butter
1/4 cup margarine
1 tsp vanilla
1 1/2 cups powdered sugar


Put cereal in a large bowl and set aside.  Microwave chocolate chips, peanut butter, and butter uncovered on high for 1 minute.  Stir.  Microwave for about 30 seconds longer until smooth.  Stir in vanilla.  Pour mixture over cereal, stirring until evenly coated.  Pour into 2-gallon resealable food storage bag. 


 Add powdered sugar.  Seal bag; shake until well coated.  Spread on wax paper to cool.  Store in an airtight container in the refrigerator.  


Merry Munching!

Wednesday, December 10, 2014

Easy, Cheesy!

In the two weeks since my last post I've really, really wanted to write.  So much so that I planned to stay up very late or get up extra early and do just that.

It never happened.

I've had so many things I want to share with you.  I've also had a Christmas musical with my girls, a guitar recital with one of my boys, shopping, baking, wrapping, homeschooling, cleaning, and laundry, plus an end of year open house for our co-op, a talent show, and about 200 other things.  I don't intend to put my blog on the bottom of the list, that's just where it ends up.


Our oldest boy is finishing up final exams this week, co-op is officially over until next year, tonight is the last AWANA meeting for 2014, music lessons pick back up in January, sewing lessons finish up next week - what I'm trying to say is, things are winding up for the year and our days are going to slow down.  YAY!  {Hopefully this will give me a little more time for blogging.}

Even though I haven't been able to blog about it, we've been having lots of holiday fun.  Our four boys were able to help with a Prison Ministry Christmas party for kids, and my honey and one of our boys were able to help with selling Christmas trees for another ministry (http://www.buyatreechangealife.com/).  We've done some shopping and today we are doing some baking.  I've even done some wrapping, (which is a big deal for me since I tend to procrastinate on that task). 

One of the things I've wanted to share with you is this delicious recipe for a very easy cheese ball.  I know you are probably receiving lots of invitations to holiday gatherings and to most of those you will be taking a little something to share.  This recipe can feed a lot of folks and it is oh-so-good! Everyone loves this and I'm positive you will too.


Rebekah's Easy Cheese Ball
  • 2 8oz packages cream cheese
  • 4 1/2 oz shredded cheddar cheese (a little more than 1 cup)
  • 1 envelope ranch salad dressing mix
  • chopped pecans
  • dried parsley
Let cream cheese and cheddar cheese come to room temperature.  Mix cheeses gradually adding dressing mix a little at a time until entire package is used.  If it's too sticky, refrigerate of place in freezer for 30 - 45 minutes.  Shape into ball and roll in a mixture of chopped pecans and dried parsley.
*Can be made ahead and frozen.

I serve this with Ritz crackers and my family loves it.  I made one last week and they are already asking me to make another.  If you make this cheese ball be sure to send me word and let me know what you think.  

Happy Cozy Holidays!

Wednesday, November 26, 2014

Happy Thanksgiving

The countdown is on.  How are things coming along for you?  I just finished up a list of everything I'm going to make today (Wednesday).  I want as little to do as possible tomorrow.  I also just finished having the paper plate debate with myself.  I've decided to use the "good" dishes but I know how much it would simplify things if we used paper plates - especially since we just grew to a party of 13.  :)

Here's a hint that goes back 20 years for me.  I read this in my very first Gooseberry Patch cookbook when I was a new wife (and Thanksgiving cook).  We tried this on our first turkey and we've been doing it ever since.  

  • Before you put your turkey in the oven, cover it with breakfast link sausages stuck on with toothpicks...the bird will look more like a porcupine than a turkey!  Cover with foil and place in oven to roast.  About 2 hours before serving, take off the foil and 30 minutes later take off the sausages (which are almost dried, and no longer greasy) and serve them as an appetizer.  The bird will now get a beautiful golden brown and everyone will dive into the sausages.


This has become a tradition for us and it really does make the turkey extra juicy!

Here's my menu plan.  One of my friends is bringing some other dishes, this is just my part.  

Turkey
Dressing 
Mashed Potatoes and Gravy
Green Beans
Macaroni and Cheese
Broccoli Casserole
Yeast Rolls
Pumpkin Pie
Coffee, Tea, Lemonade

Everyone has their way of making pumpkin pies.  Here's mine...

3/4 cup sugar
1 tsp ground cinnamon
1/2 tsp salt
1/2 tsp ground ginger
1/4 tsp ground cloves
2 eggs
1 can (15 oz) 100 % pure pumpkin
1 can (12 fl oz) Evaporated Milk
1 (9 inch) deep dish pie crust

Mix sugar, cinnamon, salt, ginger and cloves in a small bowl.  Beat eggs in large bowl.  Stir in pumpkin and sugar-spice mixture.  Gradually stir in evaporated milk.

Pour into pie crust.

Bake in preheated 425 degree oven for 15 minutes.  Reduce temperature to 350 degrees, bake 40-50 minutes or until knife inserted near center comes out clean.  Cool on wire rack for 2 hours.  Serve immediately or refrigerate.  Makes 8 servings.

Do you need a side dish for your Thanksgiving meal?  Here are two of my favorites.

Macaroni and Cheese

Put in crock-pot:
2 cups evaporated milk
1/2 tsp paprika
1 tsp salt
2 tablespoons mined onion
1 egg, beaten
2 cups cubed cheddar cheese
2 tablespoons butter

Stir well.  Cover and cook on high for one hour, stirring occasionally.  Add 3 or 4 cups cooked macaroni, drained.  Cover and cook on low for 3 - 5 hours. 

Broccoli Casserole

1 cup mayo
1 box chopped broccoli - thawed
1 can cream of mushroom soup
2 eggs
1 1/2 cup shredded cheddar
1/2 cup Pepperidge Farm stuffing
1/2 tsp garlic powder
1/2 tsp onion salt

Mix soup, eggs and mayo.  Add remaining ingredients and mix well.  Pour into baking dish.  Sprinkle stuffing on top.  Bake at 350 degrees for 45 minutes.   

   
Lastly, here's a simple and inexpensive table.  Do you want to know my number one tip for making a beautiful table?  Iron your tablecloth.  This one little chore will make your table look ten times better.  It only takes a few minutes and if you don't have time ask one of the kids to do it, an older child who knows how to use the iron without getting burned.  You don't want an injury on Thanksgiving day - ain't nobody got time for that!


I ironed mine early this morning before anyone else was up.  


You do not need to spend loads of money on things to make your table pretty.  I found everything I needed at Hobby Lobby and the Dollar Tree.  I was in and out of the Dollar Tree in five minutes flat.  All I needed were two candlesticks and two candlestick holders.  Total spent: $3.00


I made a quick run into Hobby Lobby where most of their fall stuff is 80 percent off.  I bought these three pumpkins for pennies.  They were floral picks and had long stems on them but I used wire cutters and trimmed those right off so they would sit flat on my table.  


I picked up one more little bush while I was there and it was only a few cents as well.  I added it to my vase in the middle of the table for a little more umph.  


Now the grown up table is all set and it's time to start working on the kid table.  Oh, and the cooking...who's doing that?  Oh yeah, it's me.  I better get to work!


Don't be fooled here.  Things aren't perfect at this table.  The silverware doesn't match and those dining room windows need to be cleaned, but it's warm and inviting and the kids think it's special.  Soon the house will smell delicious and be full of people and that's what it's really about.  Things don't have to be perfect to be lovely.  An imperfect table will still bless your family.  Don't let perfection get in the way of a really wonderful holiday.  Enjoy your family and make memories.

Happy Thanksgiving!  I hope your day is extra warm and cozy. 

Tuesday, November 18, 2014

Yum-O Dinner

Sooo...what's for dinner tonight?  Any ideas?

I've actually got chili cooking in my crock-pot today and I'm very much looking forward to eating that tonight...(it's cold here, how is it your way??) but I brought you a delicious recipe that you just might want to whip up right now.

Teresa's Chicken Enchiladas


My dear friend, Teresa, shared this recipe with me several years ago.  When I tried it on my family they went cr-azy for it and request it frequently. 

1 can cream of chicken soup
1/2 cup sour cream
1 cup picante sauce
2 tsp chili powder
2 cups chopped cooked chicken
1/2 cup shredded Monterrey jack cheese
6 flour tortillas (warmed)
small tomato (chopped)
green onion (sliced)

Preheat oven to 350 degrees.  Stir soup, sour cream, picante sauce, and chili powder in medium bowl.  

Stir 1 cup of the soup mixture, chicken and cheese in large bowl.

Divide the chicken mixture among the tortillas.  Roll up the tortillas and place seam side up in baking dish.  

Pour remaining soup mixture over filled tortillas.

Cover and bake 40 minutes.  Top with tomato and green onion.

Yum-o!

Wednesday, October 8, 2014

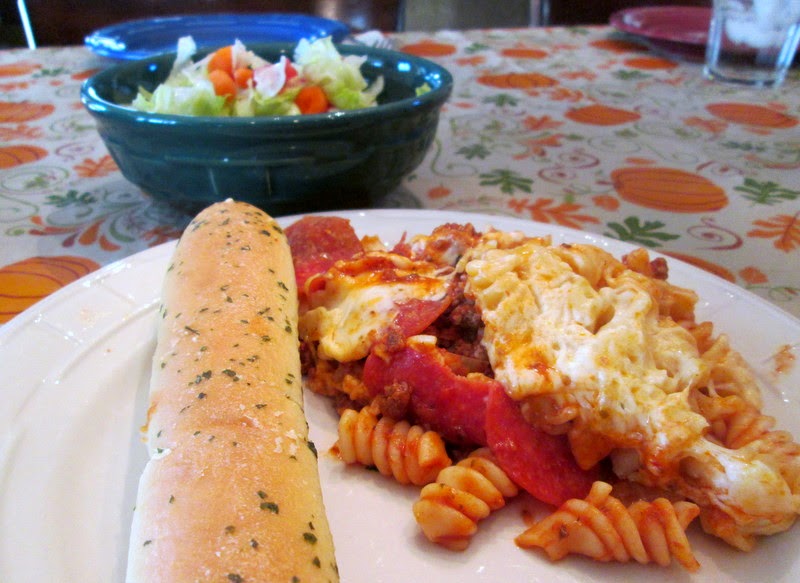
Slow Cooker Monster Stew


This is an all time family favorite at our house.  I've been making it for years.  The recipe originally came from a Gooseberry Patch cookbook I picked up a long time ago.  (If you know me at all you know I love Gooseberry Patch!)

Slow-Cooker Monster Stew

Filled with all the things little monsters love!

1 1/2 lbs ground beef
1 onion, chopped
2 14 oz cans pizza sauce
1 4.5 oz jars sliced mushrooms, drained
8 oz pkg rotini, cooked
4 c. shredded mozzarella cheese
6 oz pkg sliced pepperoni

Brown ground beef and onion together.  


 Add pizza sauce and mushrooms, heating thoroughly.


 Layer sauce mixture, rotini, cheese and pepperoni in a slow cooker. 


Heat on low setting for 8 hours.  Serves 6 to 8.


Delicious!  

LinkWithin

Related Posts Plugin for WordPress, Blogger...